Tuesday, August 18, 2020

Virtually Autumn: Summary

There are some common threads that have run throughout the summer we've spent preparing for a virtual autumn. If you don't want to re-read all twenty of the prior posts, here's your one-stop shop!

What will it take to make online learning a success for students and teachers this fall? It depends on how you define success, I think. One approach would be the pedagogically defensible one: we measure success as it relates to how well students achieve the course learning outcomes. I could write a blog post about that, but it would be too short: many learning outcomes are just as achievable virtually as in face-to-face classes. Thus, if you want to use this definition of success, then achieving success will depend in large part on how well you

  • translate your learning outcomes into ones that are achievable virtually, and then
  • communicate those outcomes to students and earn their buy-in to the course design and its philosophy

However, because of current circumstances, I'll take a perhaps unpopular approach (because it might smell like I'm advancing the perspective of student as consumer) and define success as: meeting or exceeding the students' expectations (and let's add: the teacher's expectations, too). With this definition, the big question then becomes:

What will it take to meet or exceed student and instructor expectations this fall?

In this case, I'll advance the five themes that I've seen tie together much of what I've explored this summer in this series:
  • Flexibility
  • Expectations
  • Onboarding
  • Support
  • Sustainable

Flexibility

Since we're developing what might become a "new normal," I think what it will take to make online learning a success is flexibility. We'll need faculty and students to be willing to accept that change (a universal constant) has happened, and that our expectations need to be flexible and adjust accordingly. Measured against what was relatively comfortable and safe, I honestly think that even the best virtual instruction wouldn't initially succeed - but it will eventually. We also need the faculty and students to be flexible in practical ways: faculty might consider making course policies more flexible (e.g. deadlines, more liberal use of asynchronous instruction), and students might consider (with faculty help) identifying the upsides to virtual instruction, such as its flexibility. Properly designed, virtual instruction should help students have more on-demand learning resources and also work around the student's schedule (e.g. family and work obligations, which might have radically changed due to COVID-19). Students might even realize that the flexibility potentially offered by virtual instruction will cut down on commuting time and expense, including parking permits.

Purposefully Establish Expectations Early

I feel that a sizeable portion of student feeling of success/satisfaction with a course depends on clear communication and expectation-setting at the start of each semester. Two things faculty sometimes do will absolutely tank a course: 1) increase expectations over the semester and 2) promise features/supports that the faculty can't sustain. Both of these are manageable, and virtual instruction makes the latter particularly challenging, especially when faculty probably don't yet know how all of the facets of each course are going to work (new software, new workflows, etc.) So, I've been advising faculty, as much as possible, to explicitly explain how (and why) the virtual course is designed the way it is, to help students understand the rationale.

Onboarding

I'm also a huge advocate of throwing off the shackles of "content coverage" as much as possible. This is particularly critical immediately following any course redesign, especially when new technology and workflows are introduced to the students. I'm imploring faculty to spend at least the first week of instruction (maybe two) to provide low- or no-stakes opportunities for students to practice and become familiar using technologies essential to the class, like:

  • Zoom
  • making video recordings
  • using shared Google Docs
  • turning in assignments on Canvas
  • using Google Classroom

Technical Support

Along the same line, I'm also vastly expanding the portion of my class syllabus that contains tech support information for students, with particular emphasis on providing lots of links to tutorials and resources about how to use the hardware and software I'll be asking them to use. Tech support could consume vast amounts of faculty time, and so it is well worth trying to head off all potential problems by trying to anticipate them and then providing support resources in advance.

Make Sustainable Changes; Don't Over-promise

It is better to make small and meaningful changes that you can maintain over the academic term than to start strong and then fade over the term. It is hard to know what is sustainable at first, of course, but don't try to redesign a course perfectly the first time!

The final message I'd like to share, which I've been spreading through my higher ed sphere of influence, is motivational. Faculty do have a heavy lift this summer and fall (and beyond), but course redesign for virtual instruction is a wise investment (even without additional compensation) for two reasons:

  1. If we don't do our very best now, and if we don't either exceed or actively adjust student expectations, then we might not have jobs for long
  2. The work we put into course redesign now, if thoughtfully done, will help make future semesters so much more efficient to run. I've spent most of my summer creating digital content and designing Canvas courses, but I anticipate that I'll more than make up that time in future semesters. I also hope to leverage that work in scholarly/creative activities that will also benefit my career – when life hands you lemons, make lemonade!

Conclusion of Conclusions

In sum, what faculty can do to improve the educational experience this fall (and always, really, whether teaching virtually or in person)?

  • Be flexible with your students (and compassionate too!)
  • Provide early and clear communication of expectations, including why you made the course design decisions you did
  • Purposefully onboard students to your workflows/technology
  • Advertise as many support options as you can think might be relevant
  • Don't overpromise: start course redesigns with few and sustainable changes targeted for major impact

Instruction starts tomorrow at California State University, Fresno! It will no longer virtually be autumn, but we'll actually be there! I'll keep writing the EduProffer blog here, but not in the "Virtually Autumn" series. I hope this thread has been useful, and please stay tuned for more!

Monday, August 17, 2020

Virtually Autumn: An eye on the future

Instruction begins on Wednesday days, so it might seem strange that the theme for the final two posts in the Virtually Autumn series is "Wrapping up." After all, we're not done yet!

This is a great time to start thinking about all of the topics we've thought about since virtual instruction became the norm months ago, and it is a great time to be conscious about all that we've accomplished since then. Today, let's focus on how to ensure that these efforts don't go to waste. With all of the work that instructors undertake to redesign and improve classes (both under normal circumstances and also in the wake of COVID-19), wouldn't it be nice to leverage that investment in the future? If you created any educational materials (e.g. written exercises, course plans, instructional videos):

  • how will you share your educational resources in a way that is useful to others?
  • how will you make it easy for yourself to locate and re-use those resources in a year (or five) from now?

Curating your educational materials

Sharing with others

One thing I advocate for is making written (typed) notes about how you introduce and then transition between course materials. What context did you provide students, and how did you walk them through the lesson? A great reason for doing this is not because it will help you remember how you taught that subject (well, this is a good reason…) but because course lessons are often publishable! In my discipline, extremely thoroughly annotated lessons can be peer-reviewed and published in the journal CourseSource. If you create a digital package of materials to another teacher and provide all of the instructions for how that teacher can provide a lesson to their students, then you've created something that might be publication-worthy. This is a great approach to producing scholarly work while also improving instruction. As an example, here's a CourseSource article I authored about a multi-day module I created for having genetics students explore the effects of mutations on proteins.

File Storage and Organization

If you're not particularly organized in terms of storage of files on your computer or in the cloud, now's a great time to start! (or, later, when you're not busy trying to figure out how to teach a virtual course!) There are many ways to organize files, and I'm not an expert in the theory, although I have lots of expertise, mostly negative, in exploring different manners of organization. So, here are a couple of ideas, based on the concept that a key consideration of designing your organizational system is how you will best remember the context in which you used the files.

I use different strategies in different circumstances. For example, at the moment, I have all of the graphics (photos and illustrations) I have created for all of my classes organized by topic/concept. For example, I have a Genetics folder, and nested within it are subfolders labeled with concepts or subdisciplines like "Transmission Genetics," "Pedigrees," and so on. This process takes a lot of time, but I can quickly manually browse through my library of resources relatively quickly, based on the content of the graphic I'm trying to find. At other times, I organize materials by course. So, in my Evolution folder, I have subfolders for "Genetics" (evolutionary genetics) and "Traits" and other topics.

There are certainly hierarchical storage approaches (folders and subfolders etc. - or directories and subdirectories, if you prefer) other than sorting by topic. You can also sort by class: I like to hierarchically sort some files by academic year, and then by semester, and then by course, because I tend to remember temporal/chronological contexts of files better than other contexts. Or, you might sort by the type of file: PDFs in one folder, images (jpg, gif, png and the like) in another.

Or you might divide content by what you created and what files others created - this can be useful when it is late at night before class and you're trying to find attribution for an old figure. If it came from the folder containing content you created, then you know not to spend the next hour on Google Image search trying to find the original source to cite (more on this apparently sore point below…)

Or you might sort by the type of content. Part of my organizational system involves sorting by content, but not disciplinary content. I'm not sure how best to explain, other than to give examples. I have folders for humor (cartoon images), and for news (often screenshots or web archives of news stories), and for images I use as analogies, and one folder that contains screenshots of data figures and tables from primary literature sources.

It all depends on how you think you might best remember where to find the content you're looking for.

This raises a critical point about file storage: you're doing it to make it easier to locate content that you want to re-use. The circumstances in which you might re-use the content could change over time, and it is just as likely that you might want to put the same file in multiple categories. As above, I could need to have graphics of pedigrees in both my Genetics topic folder and my Evolution topic folder. There are at least a couple of solutions.

File Naming

To me, the most important thing you can do now is to give your files very purposeful and descriptive names. Now that computers have robust search tools, it is faster for me to search my computer for a file than it is to navigate my deep hierarchy of folder-based organization. So, the easiest way to find files is to put terms you would use to search for them in their filenames. Thus, if I include "pedigree" in the names of all of my files that contain pedigree images, I can quickly find them wherever they reside on my computer.

Another reason I spend time carefully naming files is that this practice can help locate original sources. Like I mentioned above, it is really useful to have citation information directly associated with any file. You can put that in the filename, and I do this in one of two ways. I name the files of primary literature (PDFs, usually) in the following fashion: Publication Year + First Author's Last Name + Journal + brief description. I like this because when I dump all of those PDFs into one folder, the filenames automatically sort the files chronologically and then by first author. I like this because I tend to remember the approximate time a manuscript was published and who wrote it, not other aspects of that file. So, if I make a screenshot of Figure 2 from "2008 Ross Genetics stickleback sex chromosome evolution.pdf," I name that file "2008 Ross Genetics Figure 2.png," and then whenever I use that file, I have the citation information immediately at hand.

However, using the filename as a dumping ground for keywords can also be unwieldy, so additional layers of organization can still be useful.

File Aliases

Another way to deal with organizing the same file into multiple folders is to use file Aliases (that's the Apple term; I think the equivalent on Windows is called a Shortcut. The concept is pretty straightforward. When you find that you want to store the same file in two (or more) places, you could just make copies of that file and put the copies in all of those places. Instead, an alias (or shortcut) is used the same way, but instead of copying the original file, the alias (or shortcut) files are tiny files that are like address books: the only actual content of the alias file is essentially the address of the original file that you made an alias of. On MacOS, to create a file alias, you can right-click on a file icon and select "Make Alias." This creates the alias file. You can now move the original file into one folder for storage, and move the alias into a second folder. Using this approach is useful for three reasons.

First, it lets you store the same file in multiple locations, but there is only one actual file. When you open an alias file, the computer actually opens the original file (wherever you wound up storing it) because that alias file only contains instructions that tells your computer the current location of the original.

One drawback of this approach is that those "links" between the alias and the original can break. This doesn't happen regularly, but certain things you might do can disrupt alias links. For example, I use cloud storage for some of my files. They live on my computer and are copied into the cloud for storage and access from other devices. However, when this computer eventually dies, if I want to move my files from the cloud to a new computer, because the cloud storage isn't running MacOS, the alias links will not exist when I download all of my files from the cloud to a new computer. My understanding is that alias links only exist on the hardware they were created on and on hardware that runs the same OS. So, what does work just fine is that I also back up my computer to an external hard drive that is Apple-compatible. So, those files retain the alias links, and if I choose to restore a crashed hard drive from that source (instead of from the cloud), the alias links stay intact when the files are returned to a new hard drive in my computer.

The second benefit of using alias files is that their file size is tiny. It costs you essentially no extra storage space to make as many aliases of an original file and put them into as many organizational folders as you want. However, if you have a huge original file and you just make copies of it and put those copies in various folders, then you're eating up storage space.

Version Control

Third, it makes a lot more sense only to have one original than lots of copies for version control reasons. Let's say I store one file by copying it into lots of directories organized by topic, like one in Genetics and the other in Evolution. Then, for this semester, I'm teaching genetics, and I open that file and make a small change to improve the file. Now I have two different versions of the file: the older original, in Evolution, and a newer version in Genetics. One problem is that now that a year has passed since I sorted those files, I can't remember exactly how many copies of that file I created and where I stored them all. If I did remember, then I could go around and delete all of the older versions, or archive one somewhere for posterity. With an aliased file, because opening any alias or the original will only open the original file (wherever it is stored), you never have to worry about multiple versions of the same file existing across your storage space.

Other easy approaches to version control include adding the date last modified to the filename itself (yes, it is also recorded in the file metadata) and also a version number. So, my original file might be "200817 pedigree two-generation white symbols.ai," and next year when I change it slightly, that file would be "200817 pedigree two-generation white symbols v2.ai." The reason not to change the original date is because that is the information that links version 2 (v2) to version 1, so that I can easily locate the original if needed. When I have lots of time on my hands, I'd also add a brief description of the change to the v2 file, like '200817 pedigree two-generation white symbols v2 with 3rd generation.ai"

Yes, this is a lot of work, but I've found that it saves me quite a bit of time when I'm actually trying to locate a file. Because I'm stubborn, I can often waste minutes (hours?) trying to find that file…now where did I put it?!? So, for me, I'm pretty sure that over the long run I've actually benefited from these practices.

However, performing these rituals can also lead to mockery. I've identified with many Twitter threads where some (particularly academics) have poked fun at themselves for things like:

"Why do I have a grant proposal file named 'NIH R01 proposal v3 final v2 submitted.pdf'?"

Videos

I don't know why I always save what I think is the best for last, because not many people probably make it this far down these long posts - so congratulations, dear reader!

If you have been creating educational videos, I'd like to share a few practices that have helped me tremendously over the last several years. Videos can be time-consuming to create, and to curate, but once you've invested hours in making videos, maybe you can spare a few more minutes to ensure they'll reap rewards for years to come. Here's how.

First, I previous mentioned it is a good practice to make a Table of Contents for each video. This is a simple text listing of what content you start presenting at different timepoints. This is a great resource for you, as well, three years from now, when you've got hundreds of lecture capture videos and several screencast lectures, and you're trying to find that one segment of that one video file when you gave that really eloquent description of Haldane's rule.

So, what I do is save all of the Table of Contents entries in a spreadsheet (or some other file, but I like the structure that spreadsheets give). This gives me one file that I can use "Find" in to look through all of my caption text for all of my videos for a keyword that I might have put into the Contents description. Here's an example of what content I put into this spreadsheet to curate my videos:

Types of data stored in a video curation spreadsheet
The date each file was created, the type of content (lecture or screen capture), the technology (ExplainEverything or Zoom or…), the actual computer filename, the length of the video file, the name of a caption file for the video, its YouTube URL, and then the table of contents

If it isn't obvious, the reason to include the local filename and also the YouTube URL is so that I can quickly find (and edit) the original file, if for example I only want to use a tiny bit of a video in a future class and I don't want them to watch the entire video. I can also quickly locate the YouTube URL to share with others.

This approach has saved me many times when I was pretty sure I had not already made a video on a specific topic, but then by searching this spreadsheet, I happily discovered that I had, indeed, several years ago.

I use a very similar approach to catalog my blog posts, too, also mainly for ease of searching for keywords so that I can quickly find the published blog URL to share with others.

Here are some final thoughts about video organization. If you're using YouTube, definitely organize your videos into Playlists. You can make one Playlist for each class or topic, and you can manually order the videos into a logical progression. Like file aliases, you can add each video to multiple playlists if you like. It is a great way to share a single URL (the link to the Playlist) with your class instead of having a syllabus with one (or multiple) URL for each day of class.

Also, a big issue I've been dealing with lately, for which I haven't yet developed a process (please help me think about this, if you can), is how/when to efficiently know when it is time to retire a video? I never take videos down from YouTube, but there might be a point at which some videos become outdated. I can't think of a really efficient way to regularly review videos, although sometimes the number of negative comments I get on a video might be a hint that it is time to remove!

Oh, and one last most important point. If you do follow any of these time-consuming processes to make your accessing and sharing your hard work more efficient, then

please

make sure all of your files are backed up redundantly (onto 2+ drives), stored in separate physical locations, or all of this hard work might be destroyed one day!

Friday, August 14, 2020

Virtually Autumn: tidbits - taking virtual attendance & making Google docs copies for your students

Here we are, at the end of Assessment Week, and this blog series is almost finished! Instruction starts next week, and I'll provide an optimistic and forward-looking close to the series.

Today, I'm posing a question and I'm sharing one tip that didn't seem to fit well into the other topics.

Question

For a virtual class, how will you take attendance? Will you take attendance at all? Do you normally, but just not for a virtual class?

This question came up this summer in a faculty professional development course I was leading, in the context of managing large Zoom meetings. One participant asked, and then we ran through a list of options, subsequently ruling them all out:

  • take screen shots of the participants list as you scroll through it? (No: students entering and leaving the session cause the order of attendees to jump around as you're working through this process that is eating up your valuable class time)
  • copy the participants list? (No: the participants list isn't formatted as text…plus, what if some participants have signed in using their initials or a nickname?)
  • ask every participant to type their name into the chat, which can be saved? (Maybe, but: how will you efficiently process a text file of the chat to extract the student names?)

I suppose the answer to the question could be Socratic: what is the purpose of taking attendance? Now, normally (i.e. in face-to-face instruction), I would take attendance to provide a point incentive for attending class. As I age (and gain experience as an educator), it becomes more clear to me that a well-designed class should provide its own incentive…assuming that paying for one's own education isn't itself enough incentive: to take advantage of the resources you're buying, like the opportunity to learn from the professor.

Further, if your class is a virtual and mostly asynchronous course (we're having optional synchronous meetings), then there may not be much of a point in recording attendance. However, it is still important to keep track of student progress and to be intrusive in helping support students who seem to be lagging. So, "attendance" in my course comprises regular and low-stakes assignments that will be evenly distributed throughout the course, so that I have a way to monitor student engagement.

If you do want to take attendance in Zoom, there are lots more options to consider, all of which all have downsides, just like the above list. For example, you could develop a Google Form (or any other sort of survey) and provide the link to the survey in the Zoom chat, and then the students who are in the Zoom meeting can take that survey during class. Of course, they can also share the link with friends that are not in your Zoom meeting, so it isn't a perfect method of recording attendance. You could also develop a Zoom poll…but remember that only multiple-choice questions are allowed in Zoom, so you can't ask a free-response question like "Enter your name" and collect that via Zoom. You could have a multiple-choice question where all of the response are "I am in the Zoom room," and that would be collected by the Zoom poll…but I'm still not clear how Zoom saves the poll data. I know it does, and that you can download a report of the poll responses, but I don't know if the users are anonymous or if it associates the screen name of the respondent with their responses (which would be the only way a Poll would be useful for taking attendance or for any other summative assessment). Playing with this is on my long to-do list, and it is going to take me a while to get around to it!

Assessment Tip

For many reasons, I really like to develop class exercises/assignments in Google Docs and Google Sheets (and Google Slides, too, but less frequently). I'm at a university that is a Google campus, so we all have access to the entire G Suite of apps, unlimited storage, campus gmail addresses, etc., so most of the students are at least somewhat familiar with Google usage and workflows. Beyond that, though, I like the ability to share and collaboratively edit (including in real time) those documents. Plus, particularly for student assessment, the version history feature is nice, because you can easily see which users contributed in what ways during the development of the document.

However, unless you use Google Classroom to manage your class documents (which is really powerful and awesome, but I'll have to write about that some other time), sharing Google files with all of the students in your class can be cumbersome. First, you want to keep your version pristine, probably, and just distribute copies, one to each student. So, you could duplicate your "template" version, but then you're keeping track of more files on your Google Drive…and you still have to enter in all of the student gmail addresses to share the copy with them all…and then you have to remind each of them to make their own copy of that template. Otherwise, they all just have access to your initial duplicate, and they'll all start working together within that single document…so let's take a quick tangent into managing collaborative documents, and then we'll return to the original point!

Collaboration in shared Google docs

There might be some times you want all of your students to work at the same time in a single Google file. For example, you could do this to take attendance! You could create a Google Doc for each day, and have each student access that file and type their name into the doc to record their presence. However, this can be awkward in Google Docs, because it is just one long piece of digital paper, and students can work anywhere - it is difficult to provide structure to them.

 Because of the structure of Google Sheets and Google Slides, there is a reasonable solution. In Google Sheets, if you want to share a single document and have students work within the same document in their own defined spaces, you could type each student's name into their own column and ask them only to work in that column. You can ask students to do that, but they're not restricted to where in the document they can work. I've used a shared Google Sheet to create a class calendar to facilitate students signing up for class presentation dates. I ask them not to enter their name in a cell on the sheet that another student has already signed up in…but of course that instruction isn't always heeded!

Another thing that is nice about using a spreadsheet is that you can restrict access to particular cells. If you develop a template (like a course calendar) and you don't want students to be able accidentally to delete or edit that template, you can "lock" the cells you've edited and then only leave certain parts of the sheet editable by others.

A slightly more labor-intensive Google Sheet approach is to make each student their own worksheet (make one per student, and name each worksheet in the workbook accordingly).

The same approach works for Google Slides, with the same caveats. You can create a new slide for each student, share the Slides file with the class, and instruct each student to pick one slide (either blank or one you've pre-populated with a template) to edit. Students can still edit each others' work, even if you don't want them to.

Now, back to the original point about sending students copies of your template Google Doc/Sheet/Slide assignment. When you don't want group-editing, and you just want each student to receive their own copy of your file to work with, here's the best approach I've seen so far.

Create your Google file and appropriately set the Sharing permissions (blue "Share" button at the upper right):

The subsequent steps may look different to you, depending on your Google settings, but what I do is get an "Anyone with the link" setting and then change the permissions to "Editor," so I see something like this:

Now, of course this isn't what we actually want: we don't want anybody we give that link to be able to come edit the instructor template file! Fortunately, that's not what's going to happen (except read the caveat at the bottom of this post). See what we do next:

1. "Copy link" selects that huge long URL for you, and here it is in full:

https://docs.google.com/document/d/1RP-_ppsH5G4HHYbuVtm4ZqExxKKKdmAqKVrZdQmWBfs/edit?usp=sharing

At the end of each URL that Google generates for a shared doc is: "/edit?usp=sharing"

2. Change "edit" to "copy" so that your URL looks like:

https://docs.google.com/document/d/1RP-_ppsH5G4HHYbuVtm4ZqExxKKKdmAqKVrZdQmWBfs/copy?usp=sharing

3. Now, when you distribute that edited URL to all of your students (say, in an e-mail, or LMS announcement, or discussion board post, or in a Zoom chat window), when they select that link, they'll be taken to their web browser and see this:

When they select "Make a copy," Google adds a copy of your template document to the student's Google Drive, where they can edit their copy of your document.

If you want to practice this, feel free to view the two URLs above and see what the difference is from the user (your) perspective.

To me, this is the most efficient way to share copies of Google documents (again, outside of using Google Classroom). However, there is one big caveat: if students know how you did this, then they can manually edit the URL you share from "copy" back to "edit," and then they'll be able to edit your original doc instead of being asked to make a copy. Of course, this is unlikely to happen, unless you have a particularly malicious student - and if that is the case, you probably have bigger things to worry about anyway. This is just an easy process for pushing docs to students. It isn't foolproof, but if you do this a lot, this will be a time-saver!

One last thought about this process: if you are going to have students edit their copy and then share their work on that copied document back with you, it is fantastic idea to ask them to rename their copy of the document by adding their name to the end of the document name.

I hope these tips come in useful!

Thursday, August 13, 2020

Virtually Autumn: Assessment accessibility

A few years ago, a student self-identified themself to me as being dyslexic. This wasn't something they had chosen to be officially classified as a disability that would afford them specific accommodations from the university. However, they were curious if I would be willing to help them make my class tests more accessible.

In that case, as in all my classes, the exams were provided as PDF files for students to annotate with their answers and responses. What this student asked was that they be allowed to use text-to-speech: the computer would read questions aloud to the student, so the student didn't have to rely on their visual comprehension of the wording that I had written. If you're curious about the details of this story, I wrote a longer post about it here.

This experience started making me more aware of how lots of practices in exams are less accessible than ideal. Some types of questions are easily made accessible these days, particularly those that involve reading and writing (essay, short answer, fill in the blank, for example). However, even these can be made inaccessible! With the principle of universal design for learning in mind, we should design each aspect of our class for all types of students that might benefit from all forms of more accessible materials.

The goal of this post is not to provide loads of examples of how to make course materials accessible - I hope you finish reading and have your awareness raised about inaccessible practices you can avoid, so that you don't later have to do the work of figuring out how to revise them to make them accessible!

A partial list of inaccessible practices

With particular attention to a few you're likely to be tempted to use for virtual instruction

1. Graphics

I'm a biologist. That means student assessments (quizzes, homework questions, exercises, exams…) can involve a fun mixture of all parts of the scientific method, including making observations. This process often involves interpreting graphical depictions of

  • nature, like a photograph of anatomy
  • models, like a cartoon representation of a DNA double-helix
  • experimental data, like the raw visual output from agarose gel electrophoresis or an NMR spectrum

These can be exquisitely difficult to make accessible to the visually impaired, for example. So, while designing assessments, it is great if you can avoid using graphics. If you absolutely must, then please work with your local accessibility experts (you probably have a campus office that will assist) to ensure they are accessible. At the very least, add a thorough text description of each image in its "alt tag," which is the text that a screen reader would provide to a student who is otherwise unable to access the visual information in a graphic. See farther below for an example.

2. PDFs

Portable Document Format (PDF) files are deceptive. Some are absolutely inaccessible; others are reasonably accessible. It is easy to spot the former: if you use your cursor to try to select text in the PDF file and you cannot, then the PDF is simple a photograph of the text - and a screen reader won't be able to process it. Put another way: if you cannot copy and paste text from your PDF to another document, then it isn't even close to accessible. Somebody will have to use Optical Character Recognition (OCR) software to process the image and generate the text, or they will have to manually type out the words they see in the PDF file to produce a text version.

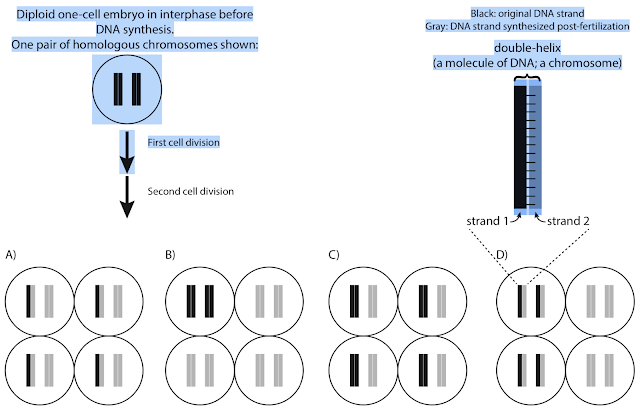
However, even if you can select text, that doesn't make the document accessible. Here's a good example of a bad PDF exercise I've created. I created this question in Adobe Illustrator (which is irrelevant; the same thing can happen from any software) and saved that file as a PDF. Below is a screenshot of this multiple-choice question, when the PDF file is open on my computer. What you'll see below (but only if you're not visually impaired…!) is what happened when I used my cursor to select text in this file. I started selecting from the top-left corner ("Diploid one-cell…") and held my mouse button while dragging down, and then I released the button about half-way down the document. The blue-shaded parts (both text and graphical elements) were selected:

Exam containing inaccessible graphics
Checking the accessibility of a PDF containing a multiple-choice question


Now, watch what happens when I copy the selected bits and paste them directly into a Word document. If I understand correctly (which is not at all certain), this somewhat replicates how a screen reader would approach interpreting that PDF file:

PDF file content reproduced by pasting into a text document reveals the text content is out of order
The PDF content after pasting into a Word document


Note, for example, that the order of text is scrambled, relative to how it was visually arranged in the original PDF, and so the text has lost its context. Imagine trying to answer this question if all you can use is this garbled text!

Plainly stated: if you plan to use PDF files in any way, which is particularly tempting for online courses, please approach that with caution.

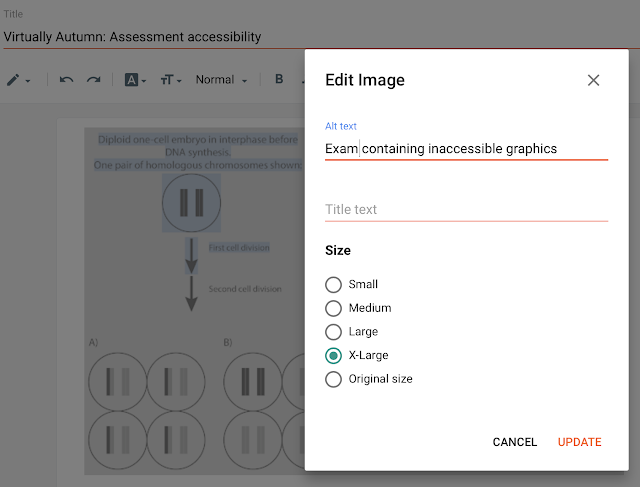
By the way, now that I've added a couple of images to this post, I can show you how to add image alt tag text, at least in the context of how Blogger is configured. When I select an image, a contextual menu provides me a place to insert the alt text to make these images more accessible:

Screenshot from this blog showing where to add image alt tag text
How to add alt text to an image in Blogger


3. Web-based Quizzes/Surveys

As great as Learning Management System (LMS) quizzes are, you must be just as wary of their accessibility - and here I'm not even focusing on visually impaired learners. For any of our online students, LMS quizzes and many forms of online surveys are not accessible to all. Here are a couple of examples.

Images, redux

It is great that many LMS and other online tools allow images to be embedded as parts of questions in quizzes and surveys, but, of course, you must first remember to provide that image alt text.

"Fancy" question types

It is also great that many LMS now ofter a plethora of question types that can be used in quizzes. We're not always limited to true/false, multiple-choice, and short answer (free response). Canvas, for example, allows matching questions (match one item from column A to one item from column B). First, depending on how your LMS or other tool formats those questions, they can be very difficult to answer on certain devices (like smartphones).

Also, some web systems format "matching" questions as a series of drop-down menus, which means that this question type isn't able to be processed in the same way many students normally would. As a specific example, I saw a matching question recently where I picked an item from column A using a drop-down menu, and then the matching item from the column B drop-down menu. Then, I had to move to the next page of the quiz to select the next item from the column A drop-down menu and match it to the column B drop-down menu. One difficulty here is that the entire matching question isn't shown in the same window, which means that students have to remember what selections they already made in previous windows if they want to ensure they've used all of the options from each column by the time they finish answering the question. In other words, the way the LMS presents the matching question makes it much more difficult to answer the question; particularly to use process of elimination as a strategy. At the very least, it will take students much longer than the teacher would probably expect to answer that question, so I hope it isn't a timed quiz! This isn't an accessibility issue, per se, but it is also worth recognizing that computers don't always represent content exactly the way the instructor intends

I recommend using the "Student View" or "Preview" function in whatever website or platform you are using for delivering online assessments. Consider the design of the activity from the perspective of a visually impaired student and of a student who is using a smartphone (and of a student with any other disability). Because virtual learning is new to many participants, most of us are already at somewhat of a disadvantage. Let's not heap even more inequity onto the pile!

Wednesday, August 12, 2020

Virtually Autumn: Cheat-resistant exams

Now that Assessment week is half-over, it must finally be time to address how to prevent cheating on homework, exercises, quizzes, and exams for online instruction (and even for in-person instruction).

In my mind, the solution is straightforward. Like many other cases, this solution is not free, and I firmly believe that the answer depends entirely on teacher philosophy, which each of us is free to change. So, I invite you to consider whether now is a good time to make some purposeful change in how you view assessing student work and how to address cheating.

Why resist cheating?

Many teachers view cheating as a problem and as something to avoid and to prevent. Well, I don't, and here are a couple of reasons why. First, I think it is important to consciously admit that this war is not winnable. Cheating is an arms race, and teachers are outnumbered and outmotivated. We can spend inordinate amounts of time trying to imagine (and defend against) every possible way a student might circumvent exam protections, but we won't think of them all.

Ways to address cheating

Remove incentives to cheat

Realizing this, we might just throw up our hands and throw in the towel. Or, we can also examine cheating from the student perspective by asking "What motivates cheating?" If there are actions we can take to reduce the motivation, then that would help our cause. When earning points leads directly to a letter grade, that provides incentive for a student to do anything they can to earn as many points as they need to earn they grade they desire. So, what if there was more than one way to earn points? It is not like there is a finite number of points a teacher can dole out, so why build an instructional economy that acts like points are limiting? Others make this point better than I will, so I'll summarize: providing students opportunities to revise work to improve it (and then to earn more points they might initially have "missed") is a great approach to reduce the incentive to cheat.

Also, we have the option to remove points entirely from the assessment equation. Moving to standards-based grading is a great approach. For example, consider a class where students are provided with learning objectives (e.g. compose a waltz) with rubrics that describe the parameters (e.g. the time signature, the types of instruments that should be included, the length of the piece). Instead of providing a continuum of possible numbers of points to earn for each parameter, the students have to achieve all three parameters to have met that standard. There can be multiple standards for a class, and the instructor can decide whether all standards (thresholds), or perhaps only a specific number of them, must be passed to pass the class.

Encourage cheating

If you really want to see your students' heads spin, then you'll consider designing assessments with cheating in mind - by which I mean: encourage cheating collaboration as part of the assessment! Of course, we call collaboration "cheating" in the classroom, but in "the real world," collaboration skills are sought by many employers. Maybe we should be helping students develop and hone those skills, and maybe it would even be useful for us to be assessing those skills themselves? Specifically, I'm thinking about group exams, where teams work together. Yes, it can be more difficult to assess the individual work of team members, and there are ways to do this, like peer evaluations.

Likewise, I now run all of my assessments as open-note/book/internet. I do ask students not to collaborate with each other on certain items, and I also ask students to be sure to cite their sources if they use a resource to assist with the completion of the assessment. In other words, I work to destigmatize using all of the resources at one's disposal to address a challenge. All that is required to effectively implement cheat-resistant exams (and other assessments) is to design those assessments to be more difficult!

Make cheating not worthwhile

Are you worried that students taking your online exam can Google the answer to a question? Well, then don't ask that question. Or, if you do, make it worth so few points that the student will spend more time than it is worth looking up the answer. Instead, design more high-level Bloom's taxonomy type questions (like prompts to "compare," "defend," "design," "create," etc.) I've previously written an extensive post on this idea that you can read here. To summarize the key ideas of this approach:

      • make sure assessments throughout the course combine the full spectrum of question styles from easy (like multiple-choice) through difficult (like essay questions)
      • based on your letter grading scale (e.g. >90% is an A), assign points to questions so that those top 10% of points students need to earn to get an A are difficult to answer - questions you don't think students who, in your mind, are B students, should be able to answer

Design assessments to require unique student responses

The reason this approach works to produce cheat-resistant assessments is that the high-level Bloom's taxonomy questions require unique student output. Even if students worked together to outline an essay, for example, no two students would turn in the exact same wording.

Yes, these question types take longer to grade…and if you're that concerned about student cheating, then you should be willing to put in the extra effort, right? There's no such thing as a free meal. Consider that cheating and time grading are opposite gradients of the same spectrum. Do you want an exam that grades itself? That is a highly cheatable exam. Do you want a cheat-proof exam? You'll spend a lot of time grading student work. The great thing about this system is that each teacher can decide where on the spectrum they want to be. To be practical:

      1. start with the idea of how much time you're willing to invest in grading student work, and
      2. then design the exam to meet that need, and
      3. then be comfortable in knowing that you've designed an exam that is as cheat-resistant as you think it should be

I've been using this approach in many of my college classes for multiple semesters, and I'm happy to let you know that grade distributions didn't change much when I started giving open-internet exams that contained more difficult questions. In other words, for those of you that think more students will get higher grades in open-internet exams, that's definitely not the case. Likewise, the more difficult questions didn't cause the grade distribution to drop. Students quickly realized that I wasn't putting emphasis on rote memorization (T/F, multiple-choice, fill in the blank questions that are easily cheatable), and that instead they should focus on studying those higher-level concepts.

I readily admit that these approaches will not all work in every discipline, especially when memorization and recall is actually important to measure. In particular, I feel for my colleagues who teach foreign language, because it is incredibly difficult to test student vocabulary knowledge and their ability to read, write and translate a foreign language when that student has access to a web browser.

However, for many, using some of the above ideas will help make assessments more cheat-resistant, and you can decide whether to use positive incentives (e.g. encourage collaboration, allow revisions) or negative ones (e.g. more point weight on difficult questions, fewer Google-able questions), or a combination, to achieve that goal.

Tuesday, August 11, 2020

Virtually Autumn: Format flexibility

This one is short and sweet. Today, format flexibility is not about accessibility (although that is important!) but is about given students the opportunity to demonstrate their knowledge in the way that they prefer.

So, as with many posts in this series, the main drawback to the instructor is: it takes more time. And, the main benefit to the instructor is: it helps engage and retain students.

The concept is simple: if you develop an assignment, then providing options in how students produce and deliver their response gives them flexibility - the hottest commodity of the year decade …well, just a great practice in general!

Examples

In my own practice, I reserve this for major assignments. For quizzes and small assessments, I do still rely on true/false, multiple-choice, and some short answer responses. They're easy to score, and come nicely packaged within in my LMS or as a spreadsheet. But, for the big ones, I'm happy to let students be creative, especially when creativity is the goal:

  • Do you have students write essays? Then (unless the purpose of the essay is to evaluate spelling and punctuation) also let them video or audio record them speaking their essay.
  • Do you have an exam question where a student has to understand how to perform a calculation to find the answer? Instead of writing a multiple-choice question with fixed responses, ask the student to record video of themselves solving the question on paper (or on the whiteboard in Zoom).
  • Do you have students type reports about historical events and the connections between them? Sure, a typed report is good; maybe a web-based interactive annotated world map would be equally good - if not better?
I hasten to add that flexible format responses tend to provide built-in cheat-proofing, because students are creating their own materials as part of the process!

Cons

Yes, it can be more time-consuming to score multiple types of student responses to the same prompt, because it can take additional mental overhead for the instructor to consider how to evaluate different forms of expression. This is a great reason to develop rubrics, but that's not the topic for today!

Pros

However, I hope you will find that the extra effort it takes to adapt grading to potentially multiple forms of expression is more than compensated by the ease of watching a student video. Now, I fully admit that this is my own proclivity, and I know that at least one person who will read this post will rather read the essay than watch/listen to it. However, for many students (and even for some teachers), it is much faster to record and post a video than it is to type a response. I'm keenly aware of this because of the time I've spent manually transcribing videos to produce captions. It sometimes takes me three to four minutes to transcribe one minute of the spoken word.

Tangent: do stenographers make good money? If so, I encourage you to consider that as a profession! If you want your mind to be blown, check out the Wikipedia article that describes a bit about how stenography works using a chorded keyboard). Live captioning in modern videoconferencing leverages stenographers, and I imagine this will be a booming profession.

I'm also aware of colleagues who teach composition and who equally appreciate the format flexibility that they gain when they embrace students submitting work in various formats. As in the above example, imagine how much more quickly the teacher can provide feedback to a student by recording their audio explanation instead of typing it. Plus, the student benefits not just from the content (if written) but also hearing the tone and inflections of your voice.

Taking action

One piece of advice for writing instructions that solicit an assignment that has a flexible format: do actually provide some limitations! First, "flexible" doesn't mean "any." You might offer that students can submit written or video responses, but it might be appropriate to specify what video format, especially if it matters to your LMS or your computer. You might want .mp4 or .mov video files but not .mpg, for example. More likely, you'll also want to specific a file size and/or length limit. No videos longer than two minutes or file sizes greater than 200 MB!

Ultimately, as you write the instructions for the assignment, please pause and review them before you post them. Ask yourself whether you've added descriptions or mechanisms that restrict the format; if you have, remediate your instructions to provide a bit more latitude to your learners.

Monday, August 10, 2020

Virtually Autumn: Deadline flexibility

This week, the last full week before I begin instruction for the fall semester, let's discuss assessing student work in virtual classes. Today's topic is straightforward, but it is still not going to be the shortest post yet: do assignments really need to have deadlines?

Why not deadlines?

The very fact that many of us are teaching remotely speaks to the unique situation we now face. That situation has caused great upset in so many facets of our lives and our students' lives, including our schedules. Thus, it is reasonable to consider whether you will actively provide opportunities for students to complete at least some assignments on a flexible deadline.

"Maybe you'd actually prefer to have drafts of student essays gradually roll in during the term, instead of having them all show up in your inbox for feedback at 11:55 pm the day they're due?!"

Accomplishing this will take some reflection, an open mind, and willingness to redesign aspects of your course.

Why deadlines?

Now, I hasten to add that, until recently, I never considered flexible deadlines; I'm pretty much a hard-ass when it comes to getting work turned in on time. Why? Well, I actually cannot defend that stance based on pedagogical perspectives that I'm aware of. Perhaps the one justification I can fathom is that deadlines keep students on track to cram all of the content "needed to be covered" in a course into the length of the academic term.

What are other benefits of deadlines? Please add some comments to this post, if you have ideas. The only other one I'm aware of is the belief that they reinforce (maybe even "teach") responsibility - that students need to practice doing work in a timely manner, as will be expected of them in the "real world."

Instead, it seems to me that deadlines aren't designed to help students, at least in most cases; they're for the benefit of the instructor. I know that I love deadlines, because it means that I can sit down and grade all of the same assignment at once. This is selfish, but it does have at least one benefit to students, too, which is that I suspect grading is more consistent when it is performed at the same time.

There may also be a benefit of deadlines if it is useful, based on the course, to keep all of the students moving through content at the same pace. Deadlines can be useful for encouraging communication, as in asynchronous discussion boards. If the pace of communication isn't sustained because nobody has yet started writing, then the goal of having that discussion will not be met. Thus, I like to think of deadlines as incentives, not as make-or-break cutoffs. I hope you'll agree with me!

How to support flexible deadlines

Not every deadline needs to be flexible, and to use an unfortunate analogy, we shouldn't provide students enough rope to hang themselves. We probably ought not simply hand the students the syllabus and the list of assignments and say, "Just make sure it all gets done by the end of the term!" How many students will that unstructured approach help? Probably not many.

To keep my proposal here focused, I'll describe my approach for my course design, and I hope you'll be able to draw some inspiration from aspects that perhaps resonate with your course.

In my blended learning virtual course, students watch lecture videos and/or read course materials before coming to optional synchronous Zoom meetings where I'll provide guided opportunities to discuss, practice, and ask questions about content.

In genetics (as as is true of every subject I can think of), there is definitely an at least somewhat linear order in which topics are introduced. We start with basic concepts and vocabulary, and build from there. This often means we also work in a chronological order. So, while I expect students to move from point A to point B and then to point C, the big question returns to whether the students should be moving at the same pace (i.e. should there be deadlines)?

For this type of course design (a mostly asynchronous course, with content delivered online), I provide the order of topics, laid out in the course schedule in the syllabus, and I suggest deadlines to stay on track. I explain to the students that the reason for the suggested deadlines is to keep everybody on pace as much as possible, so that we have common themes to discuss and questions to address when we have our synchronous meetings. Otherwise, some students might ask questions from the first unit when most are on to the fifth unit…and that's not a good use of everybody's time.

Throughout the semester, especially if you have some flexible deadlines, it is more important to monitor individual student progress and to be intrusive about communicating with students about their performance. Don't be overbearing, but be supportive: if students are behind your timeline expectation, let them know you noticed, and express concern and your willingness to provide support if needed. Especially in online classes, it is easy for students to become disengaged, and reaching out to students at regular intervals is a great strategy for helping them succeed in your class.

In my implementation of flexible deadlines, I have decided not to have midterm exams - at least not those conceived as being a test taken synchronously by all of the students. Instead, students get feedback on their understanding and performance through a series of smaller activities (let's call them "quizzes") as they move through the course. If you like, there can be high-value summative assessments, like exams, at various waypoints in the course. Heck, maybe you'd actually prefer to have drafts of student essays gradually roll in during the term, instead of having them all show up in your inbox for feedback at 11:55 pm the day they're due?!

Who will flexible deadlines help?

Here's one scenario among many: the student who already excels in the topic, for whom much of the course will be familiar (if not repetition from prior classes). If they can consume the course content and perform to your expectations, then is there a benefit to them having to spend the entire academic term doing that? There may be if you have designed your course to provide additional benefits, but if not, then flexibility can help that student focus on other courses (or work, family, etc.) that they would like to prioritize higher.

As a teacher, I have disciplinary and professional standards: I have expectations of my students. I'm willing to give students flexible options for how they demonstrate whether they have achieved those standards. In most cases, the amount of time (or lack of time) it takes a student to meet or exceed that threshold is completely irrelevant. Thus, I propose that deadlines be optional; that they be guidelines for students that want that structure.

You can even add some incentives to follow those guidelines! In other words, be flexible with your flexibility: a compromise could be to provide each student with three opportunities to miss a deadline and not have it count against them. Or, let students "bank" deadline credit: if they turn in work three days early, for example, then they get three days worth of deadline extensions they can use at any point in the semester for other deadlines that they don't meet. This approach gives students agency in their education and might even help improve mindset and engagement.

I have no illusion that these approaches are easy to implement. They do require additional accounting of the instructor, and so I very much doubt you will decide to adopt them. Instead, I provide them at least as examples of types of flexibility you've never thought of before that you might consider. In many situations, it is simply not practical to have flexible deadlines, but do consider providing flexible deadlines when it is appropriate.

Friday, August 7, 2020

Virtually Autumn: Group work

One way to help students build connections in a virtual class is to have them work together in groups; collaborative work is often polarizing. This is particularly true in the virtual environment, where it might be more difficult for students to coordinate with each other to meet synchronously.

Zoom

This is one way that instructor-facilitated Zoom meetings can help. If you have synchronous Zoom meetings and want to give small groups time to work together on projects, then this is a great opportunity to use those breakout rooms I mentioned earlier.

Google Suite

Although there are many tools that facilitate collaborations, aside from Zoom, I also mainly leverage Google Docs (and Sheets and Slides). These are free to use and allow multiple people to join in the same document and make real-time changes. Here are a couple of ways to use these Google Suite tools to help students perform group work. In all of these Google Suite use cases, it is great if students use a Google Meet or Zoom to facilitate real time audio communication while working on their written/visual product.

Notes

I have asked small groups of students to compile and edit the "perfect set of class notes" using a Google Doc. With the usual caveat that results tend to depend on the specific group and how well members work together, this has produced some amazing results. Group members take notes on their own during class, and then afterwards combine and edit them into a Google Doc that they can all reference.

A great thing I've noticed about this process is that facilitating students seeing each others' notes often catalyzes small group discussion. They more easily identify misconceptions and then debate them to see if they can reach a group consensus…and, if not, then they know to ask for my input. Small groups also tend to help the members identify what they agree are the most important points and concepts from class, highlighting them as particularly important to review before tests. They also are useful for catching all of the details in a class: a particular student might have been taking notes about one thought at the same time I was talking about an important point, so that student didn't catch part of what I said. Their group members can help fill that information in.

I've never used group notes in an online setting. It can be a bit cumbersome, technologically, depending on how the virtual delivery of the class is arranged. For example, if I have a synchronous Zoom meeting, students might have to choose between watching Zoom or taking notes in a Google Doc if they don't have a mobile device that allows them to have the two windows side-by-side. So, I recommend that my students take notes by hand while participating in Zoom (or watching a lecture video I've provided, in the case of an asynchronous course). Then, after class they should transcribe their notes into their shared Google Doc. Although this takes extra time for the student, there can be learning benefits of taking handwritten notes over typed notes (and also benefits of having to reflect on one's initial notes before transcribing them into a revision), but see also this additional study that partly refutes the initial finding.

On the other hand, there is a great opportunity in virtual classes to finally implement a suggestion that was given to me a few years ago (and I wish I could remember who/where, so I could give credit). For classes like mine, where students watch lecture videos before attending class, it might be beneficial for students to watch the videos together. This might have a couple of benefits. As above, it might help them reflect and discuss, in real time, any questions or concerns they have. It might also help those students relate to each other and build community when, for example, they watch part of a video that really resonates with one student, and that initiates a discussion with the entire group. So, I definitely recommend that students watch videos together (virtually and synchronously, before class) and take notes at the same time.

Presentations

Another strength of Google collaborative work is that small groups can assemble presentations using Google Slides. In my classes, small teams of students work together to develop audio-visual presentations in Google Slides. Then, using a Zoom meeting for example, one group member can Share Screen of their Google Slides window, and then the group records their presentation as a video to upload for the rest of the class to watch later.

Common Problems and Solutions

1. To create a shared Google Doc/Sheet/Slide file, I sometimes create a template that I distribute to the groups to use. Most times, I ask one member of each group to create the document and Share it with the group members and with me. In this approach, the group "leader" needs to have the Gmail address of each group member (including the instructor). They then enter these e-mail addresses in the Share function to provide access to the document.

Location of the Share button on a Google Doc
To Share a Google Doc/Sheet/Slide, the creator of the file uses the blue Share button at the top right of the window


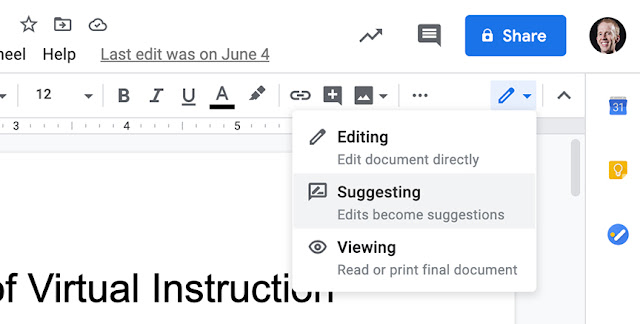
2. When group-revising a document, some students might want to change the wording of a phrase, but to do so in a way that doesn't overwrite the existing phrasing - in case they think that what they want to add might not be correct, they're not sure, but they want to register their opinion and ask for group members to weigh in on the potential edit. There are two good tools to use in this case. One is that the student can highlight some text with their cursor and select the "Comment" tool to leave a "sticky note" comment that will appear on the right margin. Equally useful is the Suggesting Edits mode. If a user toggles to this mode, then when they make text changes to the document, they appear to all users as suggestions that others can comment on, accept, or reject. This is an incredibly important tool for group editing, and it is worth showing your students how to access this feature.

Location of the Suggesting Edits menu in a Google Doc window
To switch from direct Editing mode to Suggesting, use the pencil menu at the top right of the window


3. Related to Suggesting Edits, occasionally, a group member will accidentally (or purposefully) delete some content that others did not want to have deleted. This is a great time to access the Version History of the document. Not only does this allow you to go back in time to previous versions of the document, but it also allows the instructor to get an idea of the relative contributions of each group member to the document. This can be useful for ensuring accountability of each group member to participate.

Location of the version history feature in a Google Doc
To look at who made edits and where (to access prior versions of the document), select the "Last edit…" link in the menu bar of the window


Now, speaking of student accountability for participating in class word, the last full week of Virtually Autumn posts will focus on ideas for how to assess student work in an online course.

Thursday, August 6, 2020

Virtually Autumn: Prompting interaction

In a virtual course, it certainly can be more difficult to engage students than in a face-to-face setting. This is even more true in an asynchronous context, which I suspect many of us will create in our classes this autumn. For example, I will be asking students to interact with me and with each other using web-based discussion boards. I will also be having synchronous opportunities for students to Zoom for the purposes of asking questions. What are some ways in which I can stimulate interaction and moderate it in this sort of online environment?

Stimulating

Here, I'm going to replicate some content, in an abbreviated fashion, from one of my posts from 2017. I design my synchronous classes (both face-to-face and virtual) to rely on students asking questions to get clarification on concepts they don't feel that they understand well. However, I often find that when I ask for questions, only very few students will ask one, and those are predictably the same few students each class period. So, the problem I am trying to solve is: can I create a scaffolded process to guide students through how to develop questions to ask? My goals are to help students:
  1. recognize when they feel like they need clarification, and then
  2. formulate a question to ask me that will provide that clarification
I have two main approaches to help students bring questions to ask during class. The first is to provide one "homework question" at the end of class and ask students to attempt to address it. This question is not an addition to other homework, because in a "flipped class" like mine, there is rarely any outside-of-class work to be done, other than encountering class content by reading texts and watching videos. All of the practical work is done during class. So, by asking them to work on a single question "for next time," that helps focus their attention on one concept.

Such a question that I pose to students will always be a tough question that, at its core, requires the students to employ content and concepts from the pre-class video and/or reading material. That question will often have one final part that will be difficult for students to complete. When students come to our synchronous meeting, I am fairly confident that a number of them have FAILed to answer that question (where the acronym FAIL stands for First Attempt In Learning - that's not my invention, but I'm not sure who to attribute this acronym to). This approach ensures that, at the very least, students should come to class expecting to work on figuring out how to appropriately answer that question. Thus, it sets expectations for the students and provides a single common discussion point for the next class meeting.

My belief, based partly on my experience as an introvert and a former undergraduate student, is that at least part of the delay (or absence) of students asking questions aloud in class is their discomfort in deciding exactly how to phrase their question in the heat of the moment. So, I also think it is well worth the practice of asking your students a question to solve/consider at the end of one class and then addressing it at the start of the next class, because that gives students time to articulate points that they don't feel that they understand. So, I provide some guidance to students about how to prepare questions to bring to the next class!

Here is the current version of my flowchart of prompts that I provide to students to help them pinpoint and then clarify where they encountered difficulties while addressing their homework question. I fully expect that at least some parts of this are discipline-specific, although I've tried to develop them to be fairly agnostic. I'd appreciate hearing from you what other guidance you would give students to help them define and describe obstacles they encounter while engaging in academic activities.
  • Where in the process of answering the question did you get stuck?
  • What were the questions racing through your head when you felt like you might as well stop trying to answer the question? Write those down right now, and bring them to class. Examples include:
    • "Do I need this piece of information? (is it relevant or a distractor)"
    • "How do I incorporate this information in my answer?"
    • "What does this term mean?"
    • "I have multiple possible options of how to proceed at this point - which one should I choose?"
    • "How do I know what to do next? I don't know what options exist for how to proceed."
    • "How do I know if I'm on the right track? Why should I spend more time working on this if I'm not confident in my work up to this point?"
Help students to identify their misunderstandings and to articulate them as questions by providing them with:
  1. a question that has the learning outcome at its core
  2. a framework for identifying potential questions to ask
  3. time for them to develop their own questions in response before class

Moderating

Many of my colleagues (and I!) have questions about how to moderate asynchronous class communication. I think we all understand how to moderate oral discussion in face-to-face classes, because that's what we're used to! We are comfortable asking students to remain silent and to raise their hand when they have a question or a response to a question we ask. We are perhaps also prepared with ways to respond to inappropriate/disruptive behavior in a physical classroom (though I do not feel like I am…). Even more difficult is how to moderate communication in a virtual and asynchronous environment in which we instructors are not always present to immediately take action if need be!

Here are a few ideas, and a question that I'd also appreciate your feedback on.

First, make sure that your school's policy about disruptive behavior (its definition and consequences, for example) is clearly posted in your syllabus and that its content is appropriate for a virtual modality. If you need to add or change some content to make the policies relevant to online instruction, then please do so.

Likewise, consider make a clear policy about your expectations for all things communication, both oral and written. Many schools have such "netiquette" policies available for your use. CSU Los Angeles has a great repository of such policies, including a quick overview of topics you might want to consider. For example, especially for discussion board posts, here are topics that I reinforce to students:
  • Use your real name
  • Write in the first person, taking ownership of your creative work and your opinion
  • Be careful using sarcasm, because tone is difficult to translate into the written word
  • Be professional (e.g. use good writing mechanics: check your spelling, capitalize proper nouns, use appropriate punctuation, don't use text speak like "ur statement sux"…)
  • Be critical and be respectful in your interactions at the same time
  • Stay on topic
  • Do not make ad hominem attacks
The question that I need you to help me answer, please, is: what should the instructor do when one of the above rules is broken?
  • What if a student uses a racial slur on a discussion board post?
  • What if two students start by debating the value of genetically modified organisms and then the thread degenerates into a discussion about politics, straying from the point?
  • What if a number of students "gang up" in opposition of one student's perspective?
In particular, it is yet unclear to me
1) the extent to which, and
2) how
an instructor should moderate online discussion.

The easiest solution, but perhaps an academically disingenuous one, is for the discussion board to be moderated (the instructor reviews submissions and then decides which get posted to the board). To what extent should we use this power? It is the safest approach, but student minds aren't always best stretched and broadened in the most safe environment.

Also, post moderation hinders (but is that a con or a pro?) real-time asynchronous discourse. For example, I fall asleep much earlier than most of my students, and I wake up much earlier as well. So, I fully expect that I'll wake up to the initial submissions of students, and I'll post them all…and hours later, those students wake up and see the posts, and they can begin writing and submitting responses…which I'll then see at some point later, and maybe take action on before I sleep.

While I've been writing this, I realized that I had been considering the saltatory process of post moderation as a bad thing, but maybe it is beneficial! Could it be that forcing gaps in time between comment submissions gives students time to more thoroughly reflect on their perspectives before being able to view responses?

Please share your thoughts! I promise that I'll moderate the submitted comments to this blog post as quickly as I can.

Wednesday, August 5, 2020

Virtually Autumn: Building community

Over the last two days, I introduced some technologies can be used to try to engage learners in virtual instruction, but technology is by no means a panacea!

From a practical perspective, true both of in-person and online classes, you can't engage students who are not present. Thus, one goal of engaging students is helping them develop a sense of belonging…and fostering a class environment in which that can happen. I am by no means an expert either in the philosophy or the practice of this concept, but I can at least give a few of examples of how I try to help students feel comfortable participating in my classes, even when taught online.

When I think back on my experiences as a college student, the individual classes and topics that stand out in my mind were ones in which the professors were dynamic and tried to develop a light mood in the classroom (even if we were laughing more at them and less with them, if you know what I mean). I try to do the same by introducing myself with some humor and by hopefully making me seem more of a person and less of an authority figure. For example, as part of my introduction, I often tell students that the student of genetics is about DNA, and about how changes to our DNA (mutations) can cause differences between individuals. I go on to explain that I am a mutant: I have a mutation in one gene that is involved in color vision, which is why I'm red-green color blind. That usually opens up a good introductory discussion about what exactly it means to be a mutant, and how scientists define what organism is (and is not) a mutant.

Perhaps most importantly, the first day of class is also a great day to remind students that you're there to help them learn and succeed, and that you're on their team! One approach I use on the first day of class is to ask students if they have any questions for me about anything: class mechanics, the class topic, or about me. Sometimes I have brave students ask silly questions, like what my favorite color is - and that's what I hope happens, because we can have some casual banter and demonstrate that it is easy to ask questions.

It is essential, in my mind, to address student questions in ways that validate the student's perspective and experiences. I'll have to reflect more on this, because I'm not self-aware exactly of how I do this, but I know from student course evaluations that they're aware! I often get comments about how they feel like I respect student input in the class. It might be because I use good tactics for effective communication. For example, when a student asks a question, I clarify by re-stating the question in my own words, like, "If I understand your question correctly, then I think you're asking…(this)?" Another tactic I use is to thank students for asking questions, like, "Thank you for asking that! I had almost forgotten to mention that," or "That's an excellent and insightful question."

With respect to potential benefits of a virtual environment for building community, I'm very much looking forward to how Zoom works with respect to something I'm absolutely terrible at: remembering student names. I hope we all can envision how important it could be to help students feel welcome and involved if their teacher refers to them by name - I know I felt that way when my teachers, especially in large classes, remembered my name! However, I'm essentially face blind (I have a diagnosed deficit in the ability to connect names and faces). So, thank you videoconferencing for clearly displaying each student's name beneath their video feed!

I have one final (somewhat tangential) example of another way that virtual class meetings might help level the playing field in student interaction and engagement. You might have encountered a class (though to extent this happens in every class) in which one or two students almost always have a question or want to respond to a question you pose. To this day, I'm still uncomfortable in that situation: what's the best way to kindly tell those students that others need an opportunity to participate as well? Again, I think videoconferencing will help lend me a crutch. I wonder if the dynamic of the virtual classroom is such that I (and maybe the students, too) will feel less of the "in the moment - everybody is watching" pressure for students to decide whether to raise their hands above the sea of their peers' heads and for me to decide how long to wait before selecting a student to respond to my inquiry. In other words, I expect that Zoom will help reduce that pressure to the point where I feel more comfortable saying, "Ok, I see that three students have used the Raise Hand feature in Zoom; I'm going to wait until at least two more join in before I choose somebody to respond." Plus…I hope the more strict rules of Zoom (please use the chat to ask a question, or Raise Hand…don't just unmute yourself and start talking) will also help abolish the practice of the students who routinely blurt out answers before I even get a chance to call on somebody else to participate!

The intended net effect of the decisions we make about how to run our first class meetings are to accomplish two things, I think: the first is to make the course topic relevant and interesting to as many students as possible. The second is to develop a course atmosphere that is not stressful and that is engaging and affirming. As long as we're mindful about the need to do this, we've made good strides in helping build a strong class community.